Black and Teal Hand Distressed Painted Furniture


When I popped open my first quart of Chalk Paint® by Annie Sloan, I remember thinking, "I wonder if this can live up to the hype."
After all, this decorative paint almost sounded like something out of a DIYer's fairy-tale….
Once upon a time there was a paint called Chalk Paint®.
Now, Chalk Paint® wasn't just any sort of paint. No. Chalk Paint® possessed magical powers! It could adhere to practically any surface on which it was painted–varnish, bare wood, laminate, plastic, metal, glass–it made no difference. And not only that, but Chalk Paint® had the power to free DIYers of the dreadful curse of stripping, sanding, and priming their pieces. Instead, they could jump right in to the fun stuff.
And the DIYers painted happily ever after.
Whad'ya know, the so-called fairy tale turned out to be a true story. And I got to experience the magic of working with Chalk Paint® by Annie Sloan for myself when I transformed our Hot Drinks Station table into a bright and beautiful, Provence-painted wonder. And I shared my tips and tricks with you all in the ever-popular post, The Beginner's Guide to Annie Sloan Chalk Paint®.

But the story doesn't end there.
The Plot Thickens
Though I had conquered my first Chalk Paint® project, there remained a mountain on the horizon I had yet to summit.Distressing with Chalk Paint®!
Dun dun dun.
Dear reader, does the thought of distressing make you a little nervous?
It did for me! I mean, how can it not when the word "stress"is nestled within the word "distressed"?!
Well, I'm going to spoil the ending, and tell you right here, right now that I have now conquered distressing with Chalk Paint®, too. And not only that, but distressing turned out to be the most fun part of the process. No lie.
You can summit this mountain, too.
And I'm eager to share my tips, tricks, and lessons learned along the way in an effort to make your distressing journey as de-stressed as possible. {Yuk yuk.}
Heads-up:I had a lot of questions when I first started off, so this post will be rich with detail. My hope is that this guide will serve as your one-stop shop, so you can spend less time Googling the answers to your questions and more time painting and distressing.
That said, if you're interested in more of a smooth, modern finish to your painting project, this post will be your guide.
Otherwise, co-travelers, let the distressing journey begin!
THE BEGINNER'S GUIDE TO DISTRESSING
WITH CHALK PAINT® BY ANNIE SLOAN
Step 1. Choose your next victim furniture piece.
Thinking Closet veterans may remember a certain Black Distressed Table Makeover that we did a few years ago, so that our table would match our new chairs with that signature Pottery Barn look.
For a while now, we've wanted to brighten them up a bit to better match our rustic nautical style. So, they seemed like the perfect candidates for our first foray into distressing with Chalk Paint®. Thank goodness we didn't have to prime all that surface area!

Step 2. Gather your supplies!
Annie Sloan products are sold through retailers (or "stockists") in the US, Canada, UK, Australia and New Zealand. Just search here to find the stockist nearest you. Not near a stockist? Many of them ship!
Here's a list of the supplies I used on this project:
- 1 quart of Chalk Paint® decorative paint by Annie Sloan in the color Paris Grey (1 quart can cost $34.95 or more, which seems steep, I know; however, between the money saved on primers and considering how far the paint will go, it's worth it I.M.O!)
- paint brush: Whereas I used I used *Purdy's XL 2″ and 1″ Angular Trim Cub Brush to achieve a smooth finish in the past, for this project, I used a bristle brush by Annie Sloan for a more textured, aged look. My brush was size S, which provided plenty of coverage for the table, yet could work into the nooks and crannies of the chair. I've also read that a plain ole' chip brushes work, too.
- 1 tin of Annie Sloan Clear Soft Wax (500 ml.)
- Annie Sloan Wax Brush. This is a worthwhile investment if you plan on doing multiple Chalk Paint® projects; but in a pinch, you can apply the wax with a soft, lint-free rag.
- 3 soft, lint-free rags (microfiber, cheesecloth, or a t-shirt with seams cut out will work).
- 100 – 220 grit sandpaper
- hand sander or sanding sponge
- Murphy's Oil Soap
- Extra supplies: brown builder's paper, painter's tape, optional "aging" supplies (see step 5), paint can opener, wooden paint stirrer, paper plate, plastic knife, vacuum, floor mat or cushion.

Step 3. Choose and prepare an ideal workspace.
Things to consider when choosing the proper space:
- temperature: experts recommend working at "room temperature." After having painted furniture both outside and inside, Imuchprefer working indoors. Not only can you better control temperature by setting the air, but you have less chance of insects or dust landing on your piece while paint is drying.
- ventilation: if you are in a small workspace, make sure you have windows and fans to help move the air during the drying time (keep the fans off while painting). Although I have to say, Annie Sloan Chalk Paint® is non-toxic, low odor, and has low VOCs, so you don't have to worry about strong fumes.
- light: working in natural light is ideal…although, many painting projects will likely last into the night. So, bring extra lamps into the workspace. This is vital for the waxing step.
- protecting the floor: I used painter's tape to tape down some brown builder's paper onto a large section of our living room floor to catch the drips and the majority of the dust from distressing.

Step 4. Prep and clean your furniture piece.
These are steps I take for any furniture makeover project I'm undertaking. So, you've heard some of these before!

- Remove any removable elements like hardware, shelves, drawers.
- Run your hand across the piece to find any rough patches that might need sanding (but remember, you do NOT need to sand the entire piece when using Chalk Paint® – – even if it's varnished!).
- Remove any sticky gunk with soap and water or one of my favorite products, Goo Gone.
- Fill any holes with wood glue.
- Even if your furniture piece appears to be clean, it will still be covered in oils from hands. So, make sure to give it a once over with some warm soapy water. We just used a mild dishsoap, followed up with a final pass of clear water, so we didn't leave behind any soapy residue. Then, just allow ample dry time before applying your first coat of paint.
- Edge off any sections thatwon'tbe painted using painter's tape (like the inside of drawers).
Optional Step 5. Use aging techniques to add character to your furniture piece.
Mark and I decided that we wanted our tabletop to have more of a time-worn look (rather than the look of Target circa 2007). We really like the character that comes with reclaimed furniture.
So, we experimented with a variety of aging techniques to distress our table's surface in a 15 minute "attack the tabletop" party.
(Though you may want to grab earplugs. Thiswillget loud.)
Aging Techniques
- sanding with a drill: This was actually something we had done before painting our table black, but the circular grooves from a sandpaper disc drill attachment were still visible on our table's surface, and we added some more for good measure. You can even just use a high grit sandpaper to rough things up.

- banging with a hammer (both ends), especially on the edges.

- hammering a large screw flat against the table with a block of wood as buffer. We got both the threaded side and the top edge.

- hammering the pointed tip of a nail or screw into the table in small clusters to create effect of wormholes. (This was our favorite effect.)

TOP TIP: Bang all the things. Really. It's a great way to get out any pent-up frustration.
You can grab any tool or metal object from your workbench and hammer it down to create different grooves and divots in the surface. Here is a great resource to check out for even more aging techniques.
You really can't mess this up. I just recommend keeping your marks pretty random, and not in any pattern. Though you may want to focus on aging areas that would naturally be more distressed like edges and corners.
A word of caution: be careful not to accidentally "distress" your fingers while banging around the metal tools. Also, I recommend wearing protective eyewear for this step, just to be safe.
When our "attack the tabletop" party was over, Mark also took the sander to those new grooves and divots we created to ensure they would be smooth to the touch after painting. Then, we wiped the table down with a damp rag to remove any dust.
Step 6. Apply your first coat of Chalk Paint®.
Make sure your can of paint is good n' mixed (you can set it upside down for a while, shake it up, use a wooden paint stirrer, or all three like I did). Then, methodically work section by section as the paint dries fairly quickly.
If this is your first Chalk Paint® project, and you're feeling anxious, you can start with a side of the furniture that won't get as much "air time" like the back legs of a table. Though your anxiety will quickly vanish when you see how easy it is to work with this paint!

My Top Painting Tips for Beginners:
- If you have a brand new bristle brush that you're working with, take the extra minute to condition it (video demo) before painting. Otherwise, you'll be picking out tiny bristles from your beautiful paint job the entire time…like I did. Learn from my mistakes, friends.
- Chalk Paint® is thicker than what you might be used to with latex or acrylic paint and the Annie Sloan brushes are quite dense. Thus, a little paint will go a long way. I recommend dipping just the tip of your brush into the paint rather than dunking in the whole thing. Though you'll find that if you apply too much paint to a section, you can pretty easily spread it out and work it into other sections.

- If you find the paint to be thicker than your liking, you can dilute it with some water. Or even try dipping the tip of your brush into a cup of water prior to dipping it in the paint.

- I prefer to work straight from the can rather than wasting paint by transferring it to and from a container. If you do the same, just be sure to lay the lid back on the can after dipping in your brush. That's a top tip I picked up from Perfectly Imperfect!
- When you're working on covering a section, feel free to paint against the grain or in a figure 8 pattern. Then, decide if you want your final pass to go with the grain or if you want to embrace a more slap-dash look. In that case, you can disregard grain altogether, which is exactly what I did for my first coat on the table. Though it felt so counter-intuitive to what I've always been taught! Here's a great video of Annie Sloan herself demonstrating the slap-dash method.

Goin' against the grain for a more textured finish.
- If I have to hit the pause button on my painting project in order to work on something else, I just pop my wet paintbrush in a ziplock in the fridge. It won't dry out that way! This is one of my tried and true painting tricks.

- As your first coat dries, don't panic if you the base coat or wood peers through or looks extra streaky. This is normal. And in fact, if you're going for a more aged, distressed look, you might want to stop right here! But those wanting more coverage, you'll be amazed at how much difference a second coat will make.

Step 7. Apply your second coat of Chalk Paint®.
My first coat dried in under thirty minutes. How's that for convenient? Soon after, I went back in for coat #2!
I decided to have my last brushstrokes in each section go with the grain for this coat; but follow your heart. Same goes for whether or not you need a third coat.
The second coat was my final coat for both the table and set of six chairs (which is pretty astounding considering the very light Paris Grey was atop black). But the coverage looked just right.

Step 8. Clean your paint brushes.
I know, I know. You've got things to do and furniture to refinish. Who wants to pause to clean your brushes?
But trust me, it's worth the five minutes it takes to run your brushes through some warm, soapy water. Your brushes will last for years and years to come if you take good care of them now.

I still have half a quart of paint left after two coats on our table and six chairs!
Step 9. Distress your piece where it would naturally receive wear and tear over time.
Okay, before I share the run-down of what turned out to be my favoritestep in this whole process, we have to have a leetle chatsie.
There are two different schools of thought of whether to wax before distressing (and after) or to distress first, then wax. Annie Sloan herself recommends applying at least one layer of wax first before distressing because the paint is very chalky and can produce a lot of dust when sanding.
However, I tried both methods with this project (waxed first on the table, distressed first on the chairs), and I much preferred to distress first, then wax. And here's why:
While it did indeed produce more dust, it required way less elbow grease. I was amazed at how hard my first layer of wax had become in just 24 hours, and I had to work up a sweat applying heavy force to actually get through the wax layer and two paint layers to reveal the paint and wood underneath. So, if you want a little bit easier of a go at the distressing step, do it first. You can also distress using a damp rag if you want to have a bit more control over the final look.
About that dust….
And yes, due to the high heat and humidity here in Orlando, FL, we did indeed sand indoors–in our living room–atop a large square of butcher paper. Though it turns out, Chalk Paint® dust knows no bounds, and pretty much the entire area became a dust bowl.

Clean-up wasn't as hard as I imagined once I rolled up the butcher paper and got out the vacuum. If you do work inside, be careful not to mop or steam your floors before the dust is all cleaned up because the paint is water-soluble, and you'll end up with a chalky film on your floors. Instant white-washing!
Okay, on to the actual distressing.
As someone who not only survived my first Chalk Paint® distressing project, but thrived during it, let me assure you that there is nothing to fear. You can always go back and re-paint or touch up any sections that you may have over-distressed. That's the magic of Chalk Paint®, remember?. Even if you've waxed your piece to seal it, you can paint right atop it.
I used a variety of 100 – 220 grit sandpaper to do my distressing, and it helped to have a hand sander or sanding sponge to wrap the sandpaper around. It gave me a little more to grip.

The general rule when distressing is to sand on sections that would naturally receive wear and tear over time:
- corners
- edges
- tops
- raised decorative details
- wooden knobs
- protrusions
Here's a great video to watch for technique!
I was reticent at first because in truth, I didn't quite know how the distressing would look with black paint and blonde wood peering out from under the grey paint. But after doing a little experimenting on the inside of a table leg, I was sanding up a storm!
A little sand here, a little sand there…here a sand, there a sand, everywhere a sand-sand! {Wink.}
I was having so much fun, I even mustered up the courage to take to the tabletop itself, which felt like the finishing touch our table needed.

When in doubt, remember less is more. Start with very light distressing before amping it up. You can always distress more like I did!
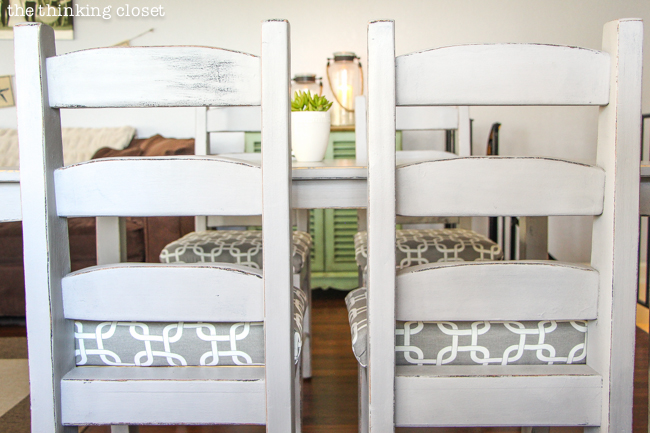
If you do have a layer of paint underneath, you can achieve this really neat two-tone distress…or tri-tone in the case of our chairs.

Though this is really just the tip of the iceberg where distressing is concerned. You can check out this inspirational post by Finding Silver Pennies for even more distressing techniques.
Be sure to dust off your sandy pieces with a dry brush or rag before moving on to the next step.

A sandpaper graveyard once I was done with distressing our table & six chairs.
Step 10. Apply your Annie Sloan Soft Wax to seal the paint.
This is the step that perplexed and intimidated me the most on my Hot Drinks Station table, but once I gave it go, I could not believe how easy it was. It's easier than applying a Polycrylic Protective Finish in my opinion.
The wax seals and protects your piece, and although it comes out of the can super soft, like Crisco, it will harden when it dries within 24 hours or less. Many people say they have used it on their kitchen and dining room tables without any problem at all; they just recommend that you only use a non-ammonia, non-bleach multipurpose cleaner on it.
If this is your first rodeo, I recommend watching several YouTube videos to get the sense of the waxing technique (like this one by The Purple Painted Lady and this one by Locksley Lane). Seriously, it's so easy.You'll wonder what you were so afraid of.

I simply used my knife to smear a chunk of wax onto a paper plate. Then, I took my wax brush and dabbed it into the wax a few times (just so I got some of the wax on the tip).
I would massage the wax into a small section (like a ninth of the tabletop or one surface of one table leg), using a combination of circular and side-sweeping motions, always ending with a sweep in the direction of the grain. You'll see the section you are working on slightly darken. (The clear wax doesn't darken your paint, but enhances the color a bit.) Also, don't worry if some of the bristles on your brush fall out here. You'll wipe them away in the next step.

Then, I put down my brush, grabbed a soft, lint-free cloth (a microfiber cloth, piece of cheesecloth, or t-shirt will do), and wiped in the direction of the grain to further massage that wax into the piece and remove any excess. The Purple Painted Lady says, "Just one or two uniformed swipes across the whole area in one sweep – and that is it."

Then, I simply repeated this step, section by section, covering every painted part of my table and chairs. You may need to switch to a new clean cloth if yours gets to "waxy" during this process.
My Top Waxing Tips for Beginners:
- Annie Sloan herself urges us to think of it like putting on hand cream. You really rub it in well, so it absorb into your skin isn't a greasy film on your hands all day. I even recommend gently brushing your hand back over the area you just waxed to make sure it doesn't catch on any waxy residue. It should be quite smooth to the touch!
- Too much wax will cause problems with tackiness. So, use it sparingly and work with a lot of light so you can really see where the wax has been worked in and where it has not. You can ALWAYS add more layers later.
- While the Annie Sloan Wax Brush is a worthwhile investment if you plan to work on multiple pieces, you can work the wax into your piece using a rag, as well. Just be sure to rub it in really well, and go back over it with a clean rag.
- While I've only worked with the Clear Soft Wax, I think sealing with Dark Soft Wax will be the next Chalk Paint® mountain I climb! I recommend watching this video by Christina Muscari if you're interested in really bringing out an aged patina with Annie Sloan dark wax. (Isn't "patina" a fun word?) Dark wax is great for heavy distressing or pieces with a lot of detail because it picks up on all those imperfections!
Step 11. Add a second or third layer of wax on any tabletop.
One layer of wax should be sufficient for most pieces, but for a table where you'll be getting extra wear on the tabletop, it's recommended to do two or three layers of wax. Most recommend waiting 24 hours of dry time in between each one, although Annie Sloan says it will often harden well before that.
According to the Annie Sloan Unfolded F.A.Q., a piece will take about 30 days to cure in its entirety, but you should be able to use it gently within 24 hours.
Step 12. Clean your wax brush.
If using a brush to apply your wax, you'll want to clean it out well. In the past, I used odorless mineral spirits with success. I just filled a cup with a half cup or so of mineral spirits, and let my wax brush sit it in for a few hours. This time, I used Murphy's Oil Soap, and it would work out the wax in less than a minute of massaging it in the sink. Then, I rinsed it out with warm soapy water, and my brush is soft again!

Optional Step 11. Buff your piece.
If you like the look of your finish as is, great – – you're done! My tabletop had a nice sheen to it, so I decided to leave it as is.

Or if you want a glossier finish to your piece, just take take a clean, soft cloth and rub circles across your piece to bring out the shine! Just make sure your last coat of wax has had about 24 hours to dry.

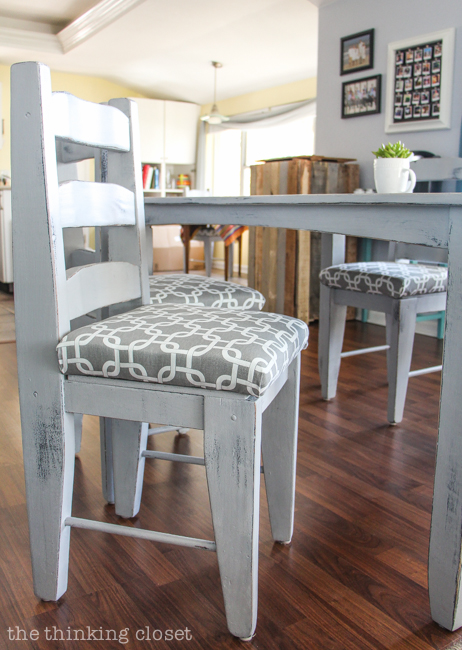
Photo Shoot!
And now, are you ready to see our aged and distressed table and chairs all gussied up and in their new glory? Here ya go:
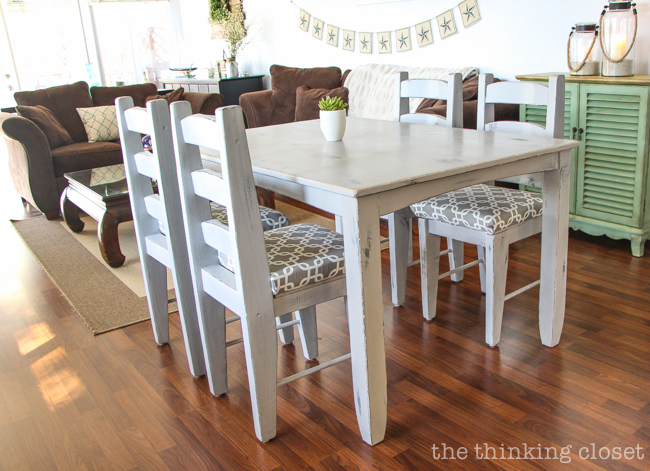

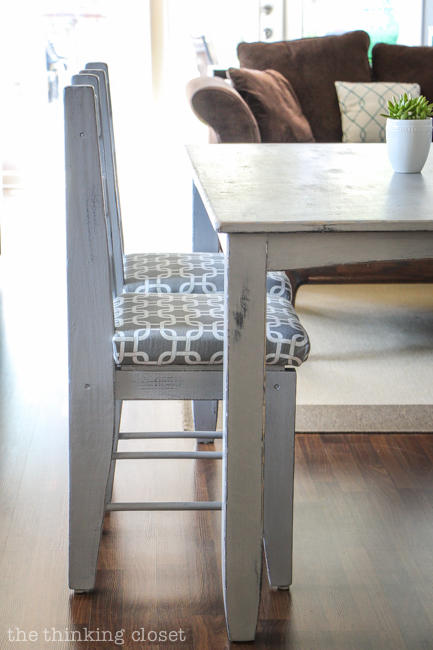
I'm amazed at how much the Paris Grey really brightens up our living room. Finally, I feel like this table and chairs actually match our style.

You can bet I'll be putting some REAL wear into this tabletop because of how much time I'll spend sitting at it.

Oh, and those ho-hum tan cushions got their own makeover to complete the upgrade. You can check out my No-Mess Method to chair seat reupholstery HERE.
To Close
Well, are you ready to summit Mount Distressed and turn this tale into your own reality? I see some of your nodding your heads out there, and that makes me all sorts of giddy.
Do let me know what questions or concerns you have in the comments below. For those of you who are experienced Chalk Paint® users, well, then, I'd love for you to chime in with your own tips and tricks. The more shared knowledge we can harness, the more magnificent our furniture transformations!

Here's a video where I chatted with my friends on Periscope about my 5 Top Tips for Using Chalk Paint® by Annie Sloan:
Thanks for sticking with me through this epically long post. Happy painting and distressing!

Full Disclosure:I received compensation and free product in exchange for an honest review. As always, all opinions are 100% my own. This post also contains affiliate links, meaning that if you make a purchase after clicking through, The Thinking Closet may receive a small commission at no extra cost to you. Thanks for helping to support this site! For more policy information, click here.
Black and Teal Hand Distressed Painted Furniture
Source: https://www.thinkingcloset.com/2015/08/28/the-beginners-guide-to-distressing-with-annie-sloan-chalk-paint/